
Wood walkways can range from just a few feet for an accent to long winding paths through a garden. Regardless of length, wood walkways add a special touch to your landscaping, lending a timeless and elegant feel to the total atmosphere of your home. Building a wood walkway can be simple or complicated, depending on the level of experience you possess and how many elements you choose to incorporate. Will you construct a simple path, or do you have larger visions of arched bridges with rails leading to a gazebo? Much depends on what you can afford financially and the amount of time you are willing to devote to the project.
What to Consider Before Building a Wood Walkway
It should really go without saying that you will want to invest in a high quality pressure treated lumber. Your wood walkway will be exposed to all aspects of the weather and settling for a low grade wood will only mean disappointment when your walkway begins to deteriorate. If your walkway is going to come into contact with your home you will need to take extra preparatory steps to ensure there is no earth to wood contact. If you do not, you may be faced with the nightmare of being unable to obtain a clear termite letter should you ever decide to sell your home.
You should also check with your county to discover if any building permits are needed. Ordinances vary and you don’t want to be halfway into your wood walkway’s construction before you find out what the regulations are. Obtain permits now to avoid fines later. You may have to provide your county with blueprints or detailed written plans of your project.
Preparing Your Site for Wood Walkway Construction
There are many different methods for building a wood walkway, each with advantages and disadvantages. For simplicity’s sake we are going to focus on one of the more beginner friendly methods. If you want to add arches or other elements to your walkway, visit Red Wood Bridges: Build Foot Bridge for detailed plans with pictures.
To get started, no matter the method, you will first need to know what exactly it is you are doing. Measure the area you are planning to build on so you will know how much lumber you will need. Generally, walkways should be no less than 4 feet in width. Create an outline for your project by driving stakes all along the intended border. It would be an excellent idea to remove any grass and grade a path for a smooth and level building surface. Apply a weed barrier, either from PVC or weed cloth to discourage plant growth under your wood.
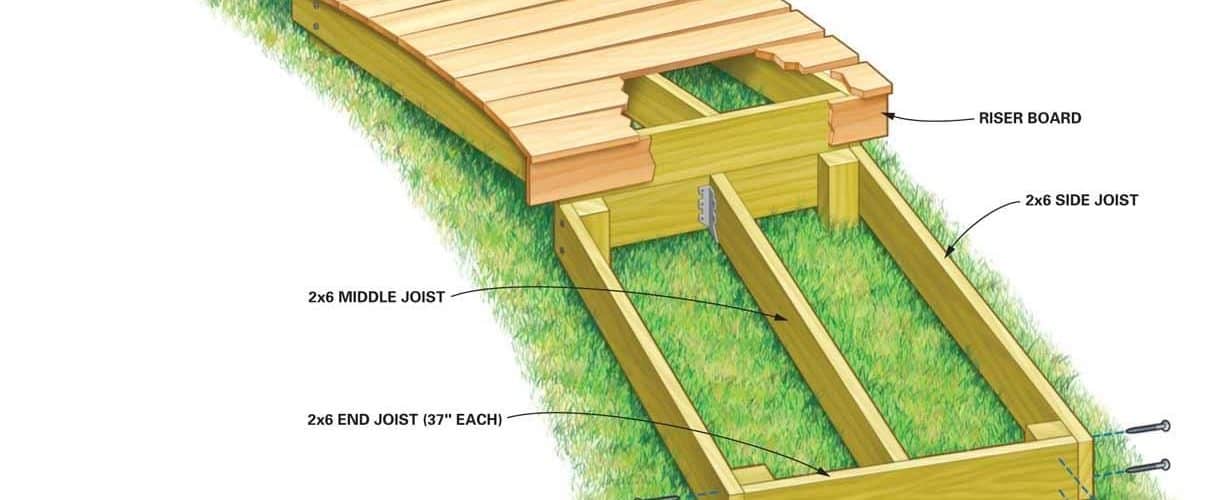
Laying Your Wood Walkway
From here construction will be much the same as that of a deck except rather than elevating the surface you will be building close to the ground. Insert posts every 8-12 inches around the perimeter to attach the frame to. You can cut these down to be covered by your walkway or allow them to remain long if you want to attach hand rails. Build your frame, inserting cross boards at the posts for structure support.
After you take careful measurements, cut your boards to fit. Nails will work fine to secure the wood, but you may also use wood screws to prevent your fasteners from backing out. When construction is complete, remove any sawdust or debris for a clean surface. If you are applying stain, do so now; otherwise give your new wood walkway a good coating of polyurethane. Once your walkway is sealed all that is left is to enjoy your handiwork.


